Managing Visits
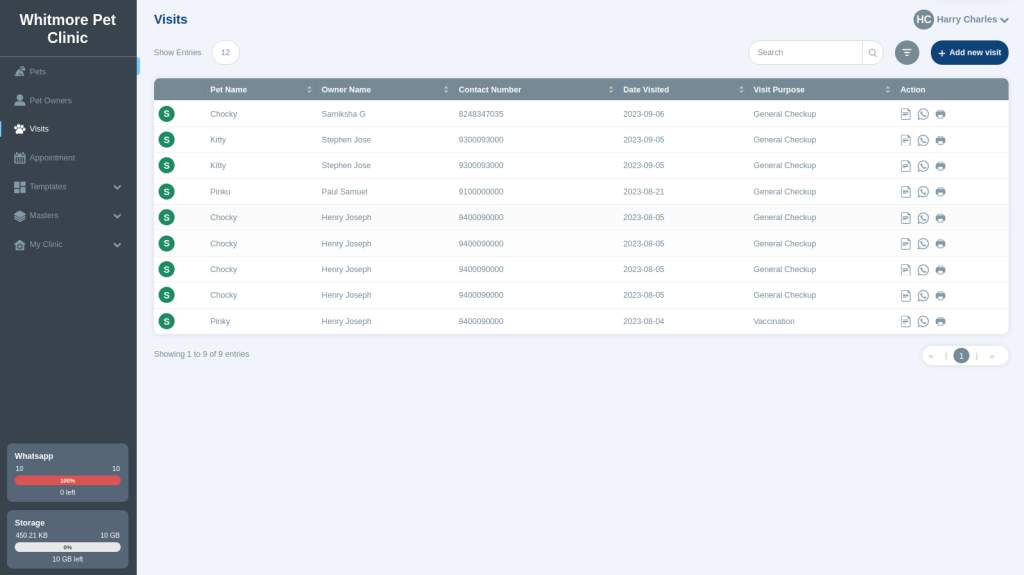
With Visits we can create a new Visit and also edit, view the history for Submitted and Draft Visits, Messaging and print the Visit details in the Letter Pad. From here we can also create a new Visit for the Pet and save/submit accordingly.
We have also included the show entries to show up to maximum of 96 Visits in a page.
We have a Search Box on Top right to search Visits with Owner/Pet name, phone number etc. for us to pull the Visit record easily. It’s a wild card search box and we can enter text and number field for easy search.
Filters will help us choose the branch and filter the records easily if we have multiple clinics associated to our account.
How to create a new Visit from Visits module:
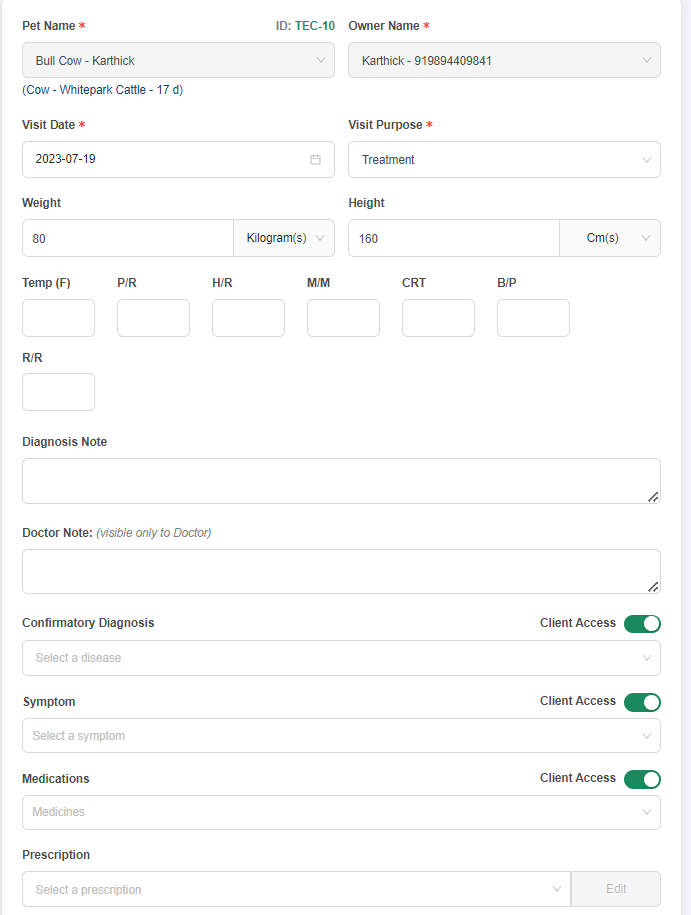
- Click on Start Consultation and enter the details for New Visit, Pet name, Animal, Breed, Owner and other Pet details will be shown in the new Visit since we are creating/starting a consultation.
- Visit date, will be date of visit and Visit Purpose – depending on the Visit type, either its General Check-up, Vaccination or Illness we can select it from the drop down and if we don’t see the purpose in the list and we can go ahead and create a new Visit purpose and choose it.
- Weight and Height shown under the new Visit can be modified based on the current visit situation, since weight and height might change after 6 months or so.
- Update all the information related to Pet – Temperature [F], Pulse rate [P/R], Heart rate [H/R], Mucous membrane [M/M], Capillary Refilling Time [CRT], Blood Pressure [BP] and Respiratory Rate [R/R].
- Diagnosis Note: Doctor who is consulting the Pet can enter the diagnosis comments based on the treatment/Vaccination/Check up provided to the Pet.
- Doctor Note: Notes entered in this section if for internal purpose of the Doctors/clinics and only visible for Doctors.
- Confirmatory Diagnosis: In this section, you can find the list of Disease added in our Masters list, based on the diagnosis by the Doctor, disease can be selected and in case if the Disease is unavailable then we can click on Add New Disease and add it, we also have an option to show this to the client or disable it.
- Symptoms: In this section, you can find the list of symptoms added in our Masters list, based on the diagnosis by the Doctor, symptom can be selected and in case if the symptom is unavailable then we can click on Add New Symptom and add it, we also have an option to show this to the client or disable it, in this section we can select multiple symptoms based on the diagnosis.
- Medications: In this section, you can find the list of medicines added in our Masters list, based on the diagnosis by the Doctor, medicines can be prescribed and in case if the medicine is unavailable then we can click on Add New Medicine and add it, we also have an option to show this to the client or disable it, in this section we can select multiple medicines based on the diagnosis.
- Prescription: In this section, you can find the template that we created for Prescription, and once we select the prescription, we can edit and add medicines based on the diagnosis and can create a new Prescription from this section and save as a template if needed. More on, how to create prescription can be found in Prescription templates.
- Documents such has Xray, Scan can be uploaded and saved for future references.
- Update Visit Type if needed to Clinic, Home or Farm
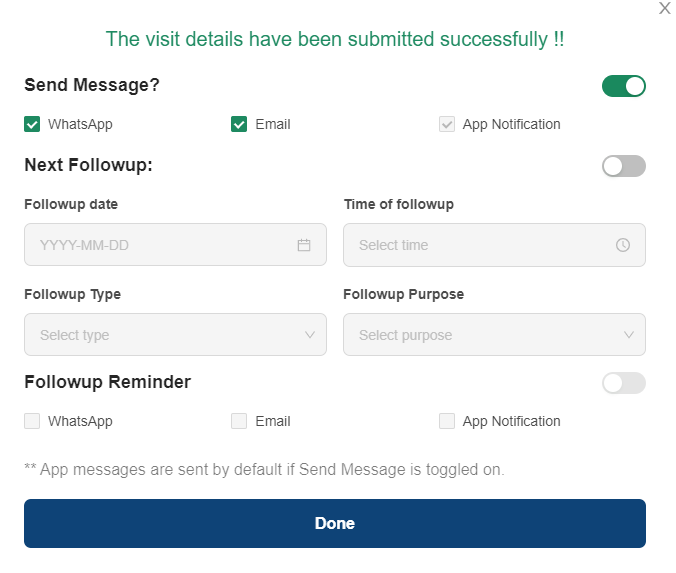
- Save and Submit: Save meaning it’s in Draft status and submitted meaning its saved and information shared with customer, while we click Submit, a new pop up window opens and confirms us to select/unselect whatsApp, Email messages and based on preferences we can make changes and at the same time, we can update the Next Follow up date, Time, Follow up Type and Purpose in the same screen and also select the mode of messaging WhatsApp, Email and click done.
- Once we click done, system sends out the message based on our preferred selection.